Landmark List
In this guide you will learn how to dynamically select
a departure and destination for your route on the map,
from interactive user input, using LandmarkList and
then draw the route on the map, and finally start a
navigation/simulation along the route.
See the Routing and Navigation Example for a guide on how to calculate a route, and simulate navigation along that route, between preset or programmatically selected start (departure) and end (destination) points.
See the GPX Routing and Navigation guide on how to calculate a route based on GPX data, and simulate navigation along that route.
Interactive Routing and Navigation
First, get an API key token, see the Getting Started guide.
Qt should be installed to continue.The Maps SDK for Qt should be installed, see the Setup Maps SDK for Qt guide.
Overview
The most important part of this example is to demonstrate generating a route from a departure location to a destination location (with optional waypoint(s) in between) which are interactively selected by the user on the map. This shows how to use the Maps SDK for Qt in a real world use case.
What you will learn in this guide:
How to interactively select a departure and destination for your route, and optional waypoints.
Select any location on the map to add as a waypoint for your route.
Select a reverse geocoding result from a popup to add as a waypoint for your route.
Compute and draw the interactively selected route.
Simulate navigation on the route.
Interactively reverse geocode, that is, click on the map to see points of interest near the clicked location.
LandmarkList holds the departure and destination locations,
which are selected interactively by the user on the map
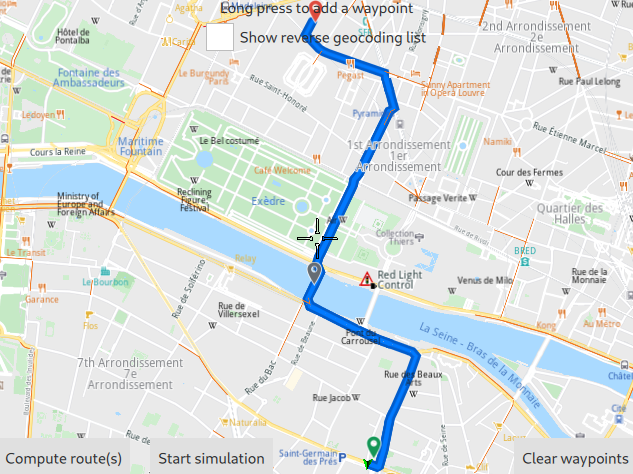
with a long tap (click and hold for about a second).
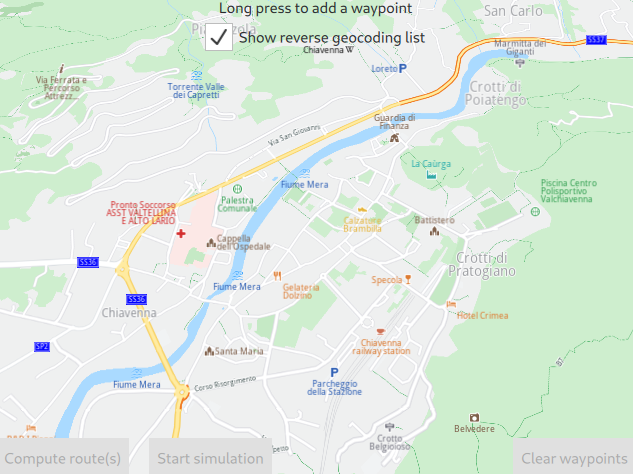
At least 2 points have to be selected, one for departure and the second one for destination. If more than 2 points are selected, then the first one is the departure location, the last one is the destination location, and the intermediate points are waypoints along the route, in order from departure point to destination point.
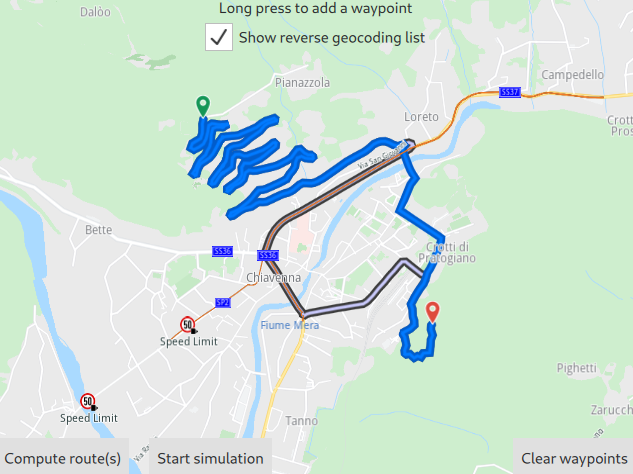
In the above image, the departure point is selected by long tap/click and hold.
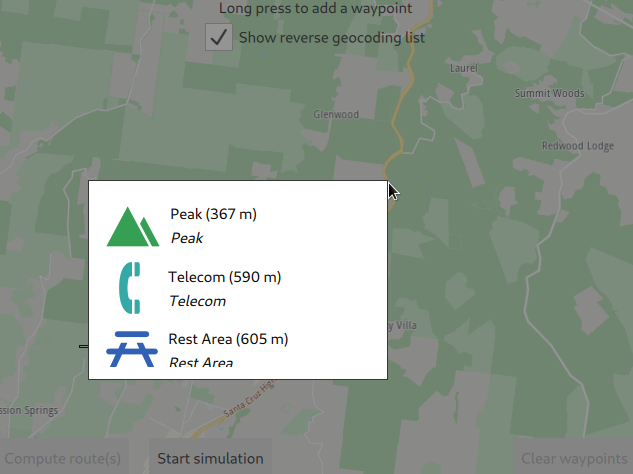
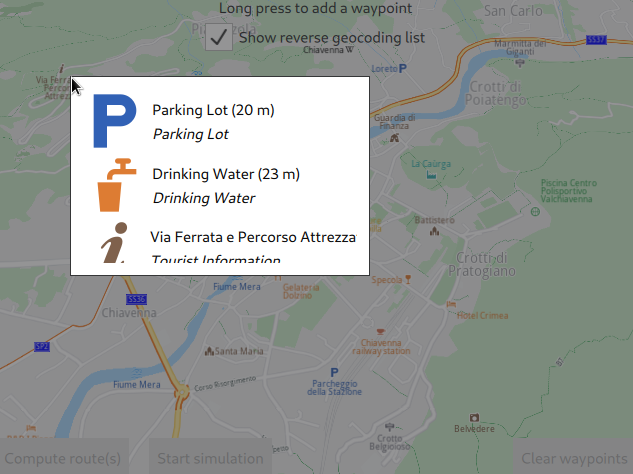
If the [x]Show reverse geocoding list checkbox at the top is checked, then the reverse geolocation menu pops up, showing 3 points of interest (POIs) near the selected position. To actually set the departure point, click one of the three options.
Or, click elsewhere on the map, outside the popup menu to close it, and then long tap/click and hold another location on the map to see other options.
If the [ ]Show reverse geocoding list checkbox at the top is not checked, then a long tap/click and hold will automatically add that location to the route.
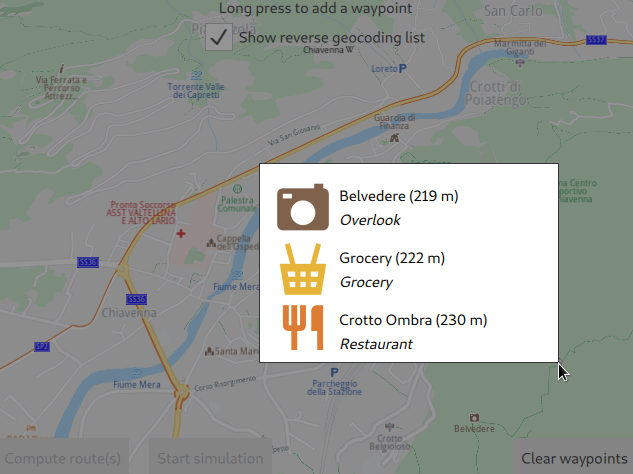
Once a location has been added, the Clear waypoints button at the lower right will no longer be greyed out, indicating that at least one waypoint has been added.

In the above image, the destination point is selected by long tap/click and hold.
The Compute route(s) button at the lower left will no longer be greyed out, indicating that at least two waypoints have been added - the departure and the destination points in this case. More waypoints can be added if so desired. The route will be calculated from the first waypoint (departure) to the last waypoint (destination) in the order in which the points were added.
To change the order, click Clear waypoints and start again. The Clear waypoints button is inactive if no waypoint has been added.
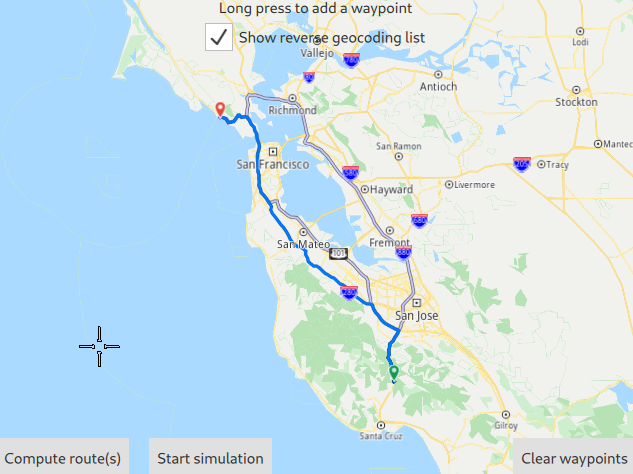
After adding at least 2 waypoints for the route, click the Compute route(s) button in the lower left of the map view to see the computed route drawn in blue between the selected departure and destination locations. The Compute route(s) button is inactive if less than 2 waypoints have been added.
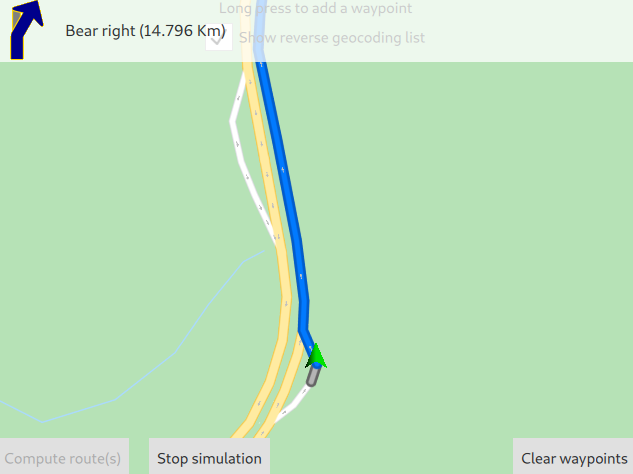
Next, click the Start simulation button to simulate navigation along the route.
How it works
In Qt, go to the File menu and select Open File or Project…
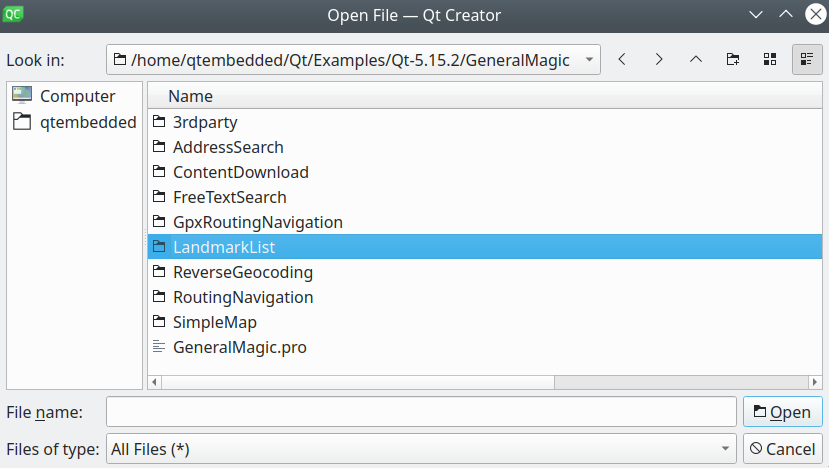
then browse to the LandmarkList example folder and open LandmarkList.pro
You may want to have a look at Setting your API Key to see how to open and configure a project and set your API Key.
In main.qml, we import the GeneralMagic QML plugin. Next, we need to make sure we allow online access, and that we are using the latest data.
 1import QtQuick.Window 2.12
 2import GeneralMagic 2.0
 3
 4Window
 5{
 6 visible: true
 7 width: 640
 8 height: 480
 9 title: qsTr("Interactive LandmarkList Routing and Navigation Example")
10
11 Component.onCompleted:
12 {
13  ServicesManager.settings.token = __my_secret_token;
14
15  ServicesManager.settings.allowInternetConnection = true;
16
17  var updater = ServicesManager.contentUpdater(ContentItem.Type.RoadMap);
18  updater.autoApplyWhenReady = true;
19  updater.update();
20 }
21}
The __my_secret_token property in the above QML code is set in C++ like this.
1// C++ code
2QQmlApplicationEngine engine;
3//...
4//! [Set API Key token safely]
5// go to https://developer.magiclane.com to get your token
6engine.rootContext()->setContextProperty("__my_secret_token", "YOUR_TOKEN");
7//! [Set API Key token safely]
8
9engine.load(url);
In this example, in main.cpp, replace YOUR_TOKEN with your actual Magic Lane Maps API key token.
And this is how to render an interactive map using a MapView
 1MapView
 2{
 3  id: mapView
 4  anchors.fill: parent
 5  viewAngle: 25
 6  preferences.cursorVisibility: false
 7
 8  onRouteSelected:
 9  {
10    preferences.routeCollection.mainRoute = route;
11    centerOnRoute(route);
12  }
13}
To start a simulation/navigation using a route generated from interactively selected waypoints, there are three steps involved:
Select the waypoints for the route
The waypoints can be selected by clicking on the map, when the [X] Show reverse geocoding list checkbox at the top of the map is checked, and then selecting one of the points of interest from the popup that appears. Or click outside the popup to close it and select a different location on the map.
 1SearchService
 2{
 3  // Reverse geocoding takes as input a location on the map (lon,lat coordinates),
 4  // in this case, interactively selected by the user, and gives as output a list
 5  // of points of interest located near the selected position, 3 items in this example.
 6
 7  id: reverseGeocoding
 8  preferences
 9  {
10    searchMapPOIs: true
11    searchAddresses: true
12    limit: 10
13    thresholdDistance: 500
14  }
15
16  // The list of 3 points of interest located near the selected position
17  // is shown here in a popup, giving the user the option to select one of them
18  // to be added as a waypoint for a route, or simply click outside the popup to close it.
19
20  onSearchCompleted: addWaypointPopup.open()
21}
22
23Popup
24{
25  // This shows the results of the reverse geocoding in a popup.
26
27  id: addWaypointPopup
28  modal: true
29  focus: true
30  closePolicy: Popup.CloseOnEscape | Popup.CloseOnPressOutside
31  width: 300
32  height: 200
33
34  ListView
35  {
36    id: searchList
37    anchors.fill: parent
38    anchors.margins: 1
39    clip: true
40    model: reverseGeocoding
41
42    delegate: Item
43    {
44      height: row.height
45
46      RowLayout
47      {
48        id: row
49
50        IconView
51        {
52          iconSource: landmark.icon
53          Layout.maximumHeight: row.height
54          Layout.maximumWidth: row.height
55          width: height
56          height: row.height
57        }
58        ColumnLayout
59        {
60          Layout.fillHeight: true
61          Layout.fillWidth: true
62
63          Text
64          {
65            Layout.fillWidth: true
66            text: landmark.name + " (" + distance(
67              landmark.coordinates.distance(reverseGeocoding.coordinates)) + ")"
68            wrapMode: Text.WrapAnywhere
69          }
70          Text
71          {
72            Layout.fillWidth: true
73            text: landmark.description
74            font.italic: true
75            wrapMode: Text.WrapAnywhere
76          }
77        }
78        TapHandler
79        {
80          target: row
81          onTapped:
82          {
83
84            // This adds a waypoint to the route by selecting
85            // an item from the popup list of reverse geocoding results.
86
87            routingWaypoints.append(landmark)
88            addWaypointPopup.close()
89          }
90        }
91      }
92    }
93  }
94}
Waypoints can also be selected directly by tapping and holding on the map for about one second.
 1Label
 2{
 3  id: infoLabel
 4  anchors.top: parent.top
 5  anchors.horizontalCenter: parent.horizontalCenter
 6  text: "Long press to add a waypoint"
 7}
 8CheckBox
 9{
10  id: useReverseGeocoding
11  anchors.top: infoLabel.bottom
12  anchors.horizontalCenter: parent.horizontalCenter
13
14  checked: true
15  text: "Show reverse geocoding list"
16}
17
18TapHandler
19{
20  grabPermissions: PointerHandler.CanTakeOverFromAnything
21  onLongPressed:
22  {
23    if (!useReverseGeocoding.checked)
24    {
25      // This adds a waypoint to the route by long-tapping
26      // (tapping and holding for about a second)
27      // a given location directly on the map.
28      // First, create a landmark that can hold a route waypoint.
29
30      var lmk = landmarkComponent.createObject(routingWaypoints);
31
32      // Next, add the map coordinates from the tap location to the waypoint.
33
34      lmk.coordinates = mapView.wgsForScreen(point.pressPosition);
35
36      // Finally, add the waypoint to the list from which the route is generated.
37
38      routingWaypoints.append(lmk);
39
40      console.log("Waypoint added");
41      return;
42    }
43
44    if (point.pressPosition.x + addWaypointPopup.width > mapView.width)
45      addWaypointPopup.x = point.pressPosition.x - addWaypointPopup.width;
46    else
47      addWaypointPopup.x = point.pressPosition.x
48
49    if (point.pressPosition.y + addWaypointPopup.height > mapView.height)
50      addWaypointPopup.y = point.pressPosition.y - addWaypointPopup.height;
51    else
52      addWaypointPopup.y = point.pressPosition.y
53
54    reverseGeocoding.coordinates = mapView.wgsForScreen(point.pressPosition);
55    reverseGeocoding.search();
56  }
57}
At least 2 waypoints must be selected for a route.
Compute the route(s)
In the second step, declare a RoutingService
 1LandmarkList
 2{
 3  // This is the waypoint list for the route,
 4  // including the departure and destination.
 5
 6  id: routingWaypoints
 7}
 8
 9Component
10{
11  // This is used for creating a waypoint to be added
12  // to the route from a location tapped on the map.
13
14  id: landmarkComponent
15  Landmark {}
16}
17
18RoutingService
19{
20  id: routingService
21  preferences
22  {
23      type: RoutePreferences.Type.Fastest
24      transportMode: RoutePreferences.TransportMode.Car
25  }
26
27  // The list of waypoints is made available to the routing service.
28
29  waypoints: routingWaypoints
30  onCompleted:
31  {
32      mapView.preferences.routeCollection.set(routes);
33      mapView.centerOnRoutes(routes);
34  }
35}
and then use it to calculate route(s).
 1Button
 2{
 3  text: "Compute route(s)"
 4  enabled: ServicesManager.settings.connected && !navigation.active && routingWaypoints.length > 1
 5  onClicked: routingService.update()
 6}
 7Button
 8{
 9  enabled: mapView.preferences.routeCollection.mainRoute.valid
10  text: navigation.active ? "Stop simulation" : "Start simulation"
11  onClicked: navigation.active = !navigation.active
12}
Do simulation/navigation
The third step is to declare a NavigationService for real or simulated turn-by-turn navigation, to start the simulation/navigation.
 1function distance(meters)
 2{
 3  return meters >= 1000 ? (meters / 1000.).toFixed(3) + " Km" :  meters.toFixed(0) + " m";
 4}
 5
 6NavigationService
 7{
 8  id: navigation
 9  route: mapView.preferences.routeCollection.mainRoute
10  simulation: true // change it to false (default) to perform real turn by turn navigation
11  onActiveChanged:
12  {
13    if (active)
14    {
15      mapView.startFollowingPosition();
16      mapView.preferences.routeCollection.clear();
17      mapView.preferences.routeCollection.add(mapView.preferences.routeCollection.mainRoute);
18    }
19  }
20  navigationListener: NavigationListener
21  {
22    onWaypointReached: console.log("WaypointReached :" + waypoint.name);
23    onDestinationReached: mapView.preferences.routeCollection.clear();
24    onNavigationError:
25    {
26      console.log("NavigationError :" + error);
27      mapView.preferences.routeCollection.clear();
28    }
29    onRouteChanged:
30    {
31      console.log("RouteUpdated :" + route.summary);
32      mapView.preferences.routeCollection.clear();
33      mapView.preferences.routeCollection.add(route);
34    }
35    onNavigationInstructionUpdated:
36    {
37      nextTurnIcon.iconSource = navigationInstruction.nextTurnDynamicIcon;
38      nextTurnInfo.text = navigationInstruction.nextStreetName + " ("
39      + distance(navigationInstruction.distanceToNextTurn) + ")";
40    }
41  }
42}